
Help Center
Your go-to resource for step-by-step guides and expert tips. Get the most out of the Connect platform with our comprehensive walkthroughs
Welcome to the Connect Help Center, your go-to resource for unlocking the full potential of our cutting-edge swag management platform. We understand that while Connect is designed to be intuitive and user-friendly, you might have questions or need guidance along the way.
Whether you're a new user looking to get started or an experienced Connect super-user seeking advanced tips, you'll find a wealth of information, step-by-step guides, and expert insights here.
If you’re setting up a new Connect account, we've got you covered. Learn how to create your account, invite your team members, and customize your default settings.
We're dedicated to providing you with the support and knowledge you need to make your swag management journey as smooth as possible!
Getting Started
Create your account
There are several ways to create a Connect account. The most common method is registering using Single-Sign-On (SSO) through Google or Microsoft.
If you are the first person from your organization to register for Connect - you'll be automatically added as the Administrator and asked a few simple questions about your organization.
Invite Your Team
During registration, you'll be prompted with the option to invite your team members to the account to start collaborating in Connect. You can modify each user's permissions and control what parts of Connect they can access. Additionally, you can add or modify team members and permissions at any time in your Account Settings.
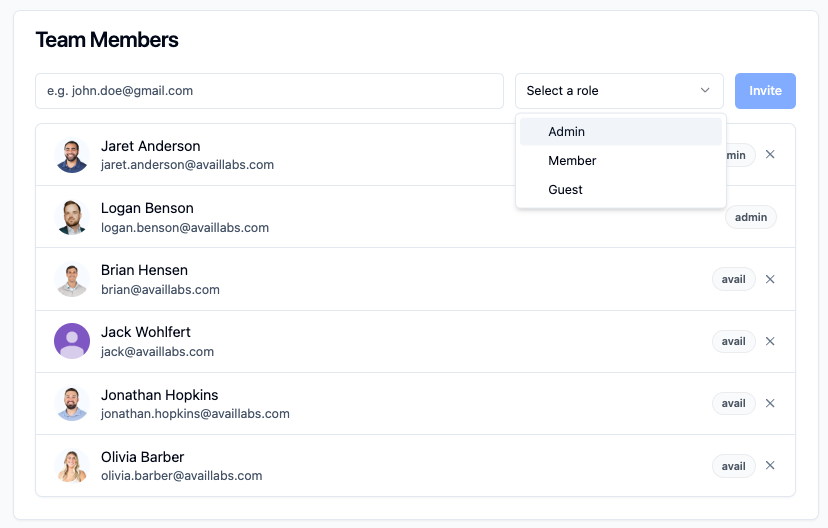
User Permissions
There are several types of access levels within Connect. These permissions were designed to allow you to customize how your team interacts with the platform. Below we'll review the types of user permissions and what they mean.
- Admin Access = the ability to use and see everything within Connect. This includes all projects, orders, invoices, stores, inventory, users, and more across the whole organization. The administrator also has the ability to invite/remove users.
- Member Access = the ability to use and see everything that the Admin Access can. However, a member can not invite/add/or remove users from the account.
- Guest Access = The ability to request new projects and view orders/invoices specific to their account activity.
Creating Projects
So you've got your account set up and you're eager to dive in. Besides, the sooner you start using Connect, the faster we can start saving you time and stress. All jokes aside.. it's time to get busy! Let's start a project.
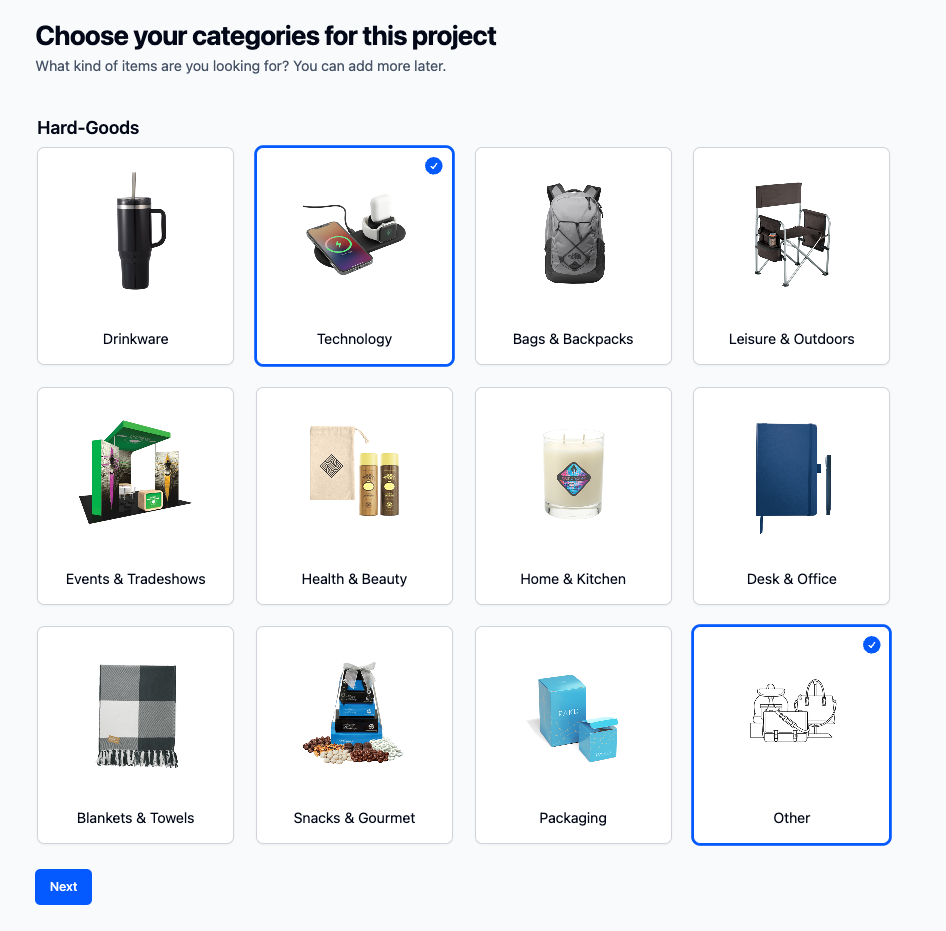
Product Categories
Good news! You don't need to sift through thousands of products and brands. Tell us what types of products you're interested in that fit your project. This section of the Project Planner let's you browse our most popular product categories and tells our team what to look for.
Need something custom or totally unique? Struggling to decide on one of our categories? Use the "Other" category and we'll ask for me detail later.
Project Name
First things first, we need to name your awesome new project. We recommend using something relevant and easy to remember. You'll want to use enough detail so you can quickly find the project later and know what it's for. For example, instead of using just "T-Shirts" try something like "2024 Employee Appreciation Shirts."
Pro Tip: Referencing the timing and who or what the project is for will help you stay organized down the road
Budgeting
We get it... sometimes nailing down budget can be a bit like hitting a moving target. With access to millions of products and thousands of brands - providing a budget estimate is a critical step for us get you the most relevant and amazing product options for your project. Regardless of how you budget, having a budget is the biggest key to project's success.
- Per Person - Budgeting per person is a quick and easy way to back into your overall project budget. "Per Person" works best for when you plan on distributing swag to a particular group. Think employee kits, holiday gifting, client gifting, rewards, etc.
- Total - Budgeting by total works great if you're looking for a variety of options and price points. You might not have a specific plan for how many people will be getting swag or what it's going to be used for. Think events, inventory, or even giveaways to have at the office.

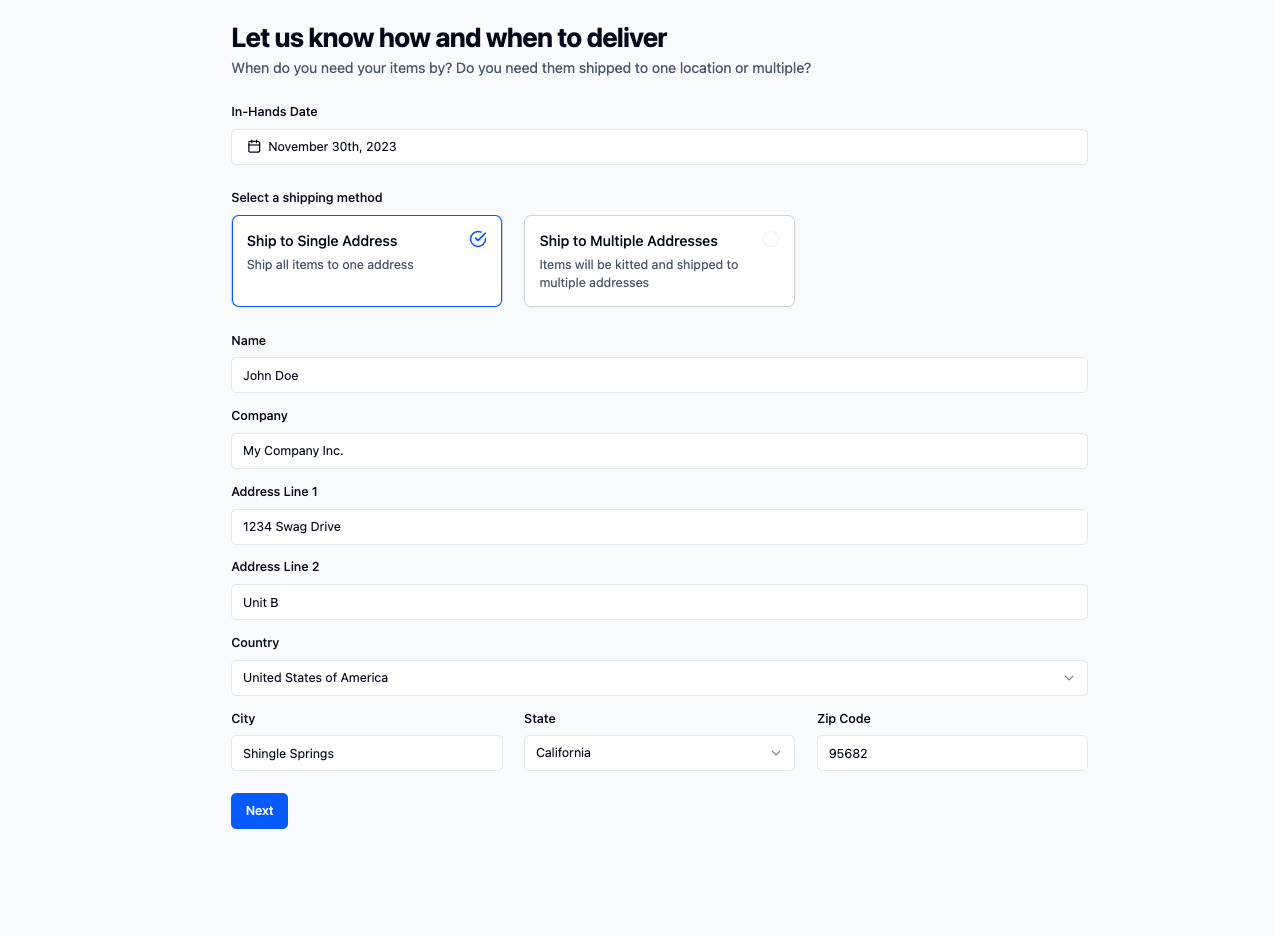
Shipping Details
A big factor in what types of items, brands, and suppliers we use is dictated bases on your "in-hands date." With enough time, anything is possible! However, our standard production times are 10-14 business days.
Part of the logistics planning should consider where we are shipping to. This will also influence how we source and what options are available. Learn more about shipping capabilities and how it works.
- Single Address = Used for when your project is being sent to one location like an office, convention center, or home.
- Multiple Addresses = Used for when your project needs to be kitted or split shipped to more than one location. Later, our team will provide an easy to use template to provide the address information.
- Add to Inventory = This method is only available if your account has inventory. This tells our team that when your project is complete, the items will be pushed to your inventory.
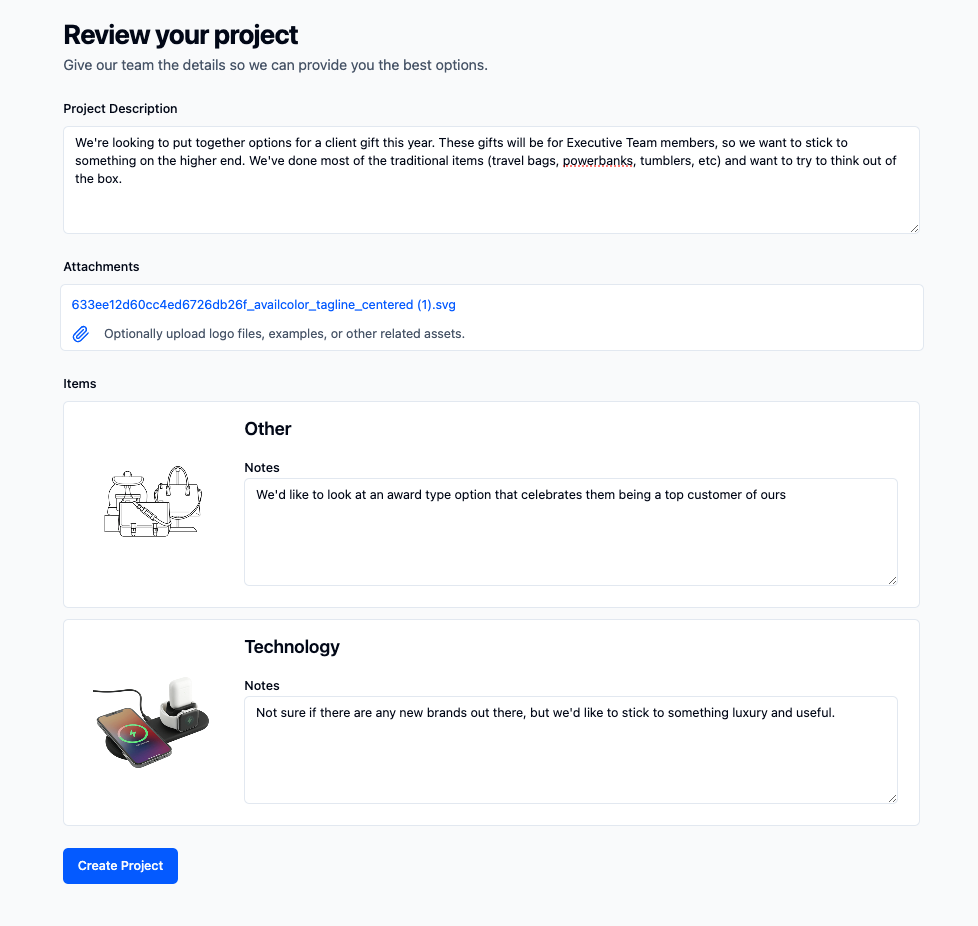
Review & Submit
Here you'll have the opportunity to provide us a brief and more descriptions surround your project. These details will be used by our team to get a better understanding of your vision. The more you details you can provide, the better!
You'll also have the ability to provide additional details on the Product Categories you selected. Here you can add specifics around what you're looking for such as colors, materials, brands, etc.
Attach any vector logo files, documents, screenshots, etc that would be helpful for our team. Learn more about vector logo files.
Request Options
Congratulations! You've submitted your Project Plan. Here you can review your plan and make any last minute adjustments. You can edit your categories, notes, attachments, and more.
When you're ready, click "Request Options" and confirm. Our team will take your Project Plan and quickly get you relevant options based on your description, budget, and deadline. You'll get notified when your options are ready to be reviewed.
Reviewing Options
Gone are the days where you have to sift through dozens of pages and hundreds of products. Our team will take your Project Plan and quickly get you relevant options based on your description, budget, and deadline.
Once you're notified your options are ready, you can jump directly into the project. Here you'll see each category you previously picked, but now with available product options for each. By clicking on a product you'll notice a familiar shopping experience that lets you view the mock up, product description, and pricing details.
Click "Add to Order" when you're happy with your option(s). By adding to your order, you're building out a cart located at the bottom of the screen. This cart will carry your total for the entire project and the options you selected.

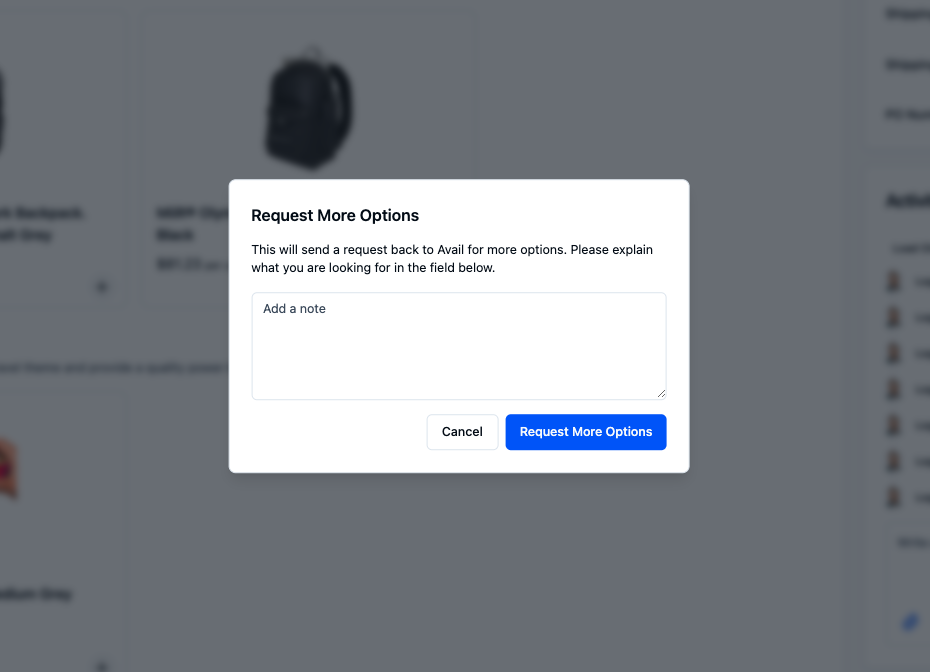
Request More Options
If you receive your options and either don't see something you like, or need to make adjustments - simply "Request More Options". This will prompt you to provide your feedback and any necessary notes. This feedback will go directly to your representative for them to find you new options.
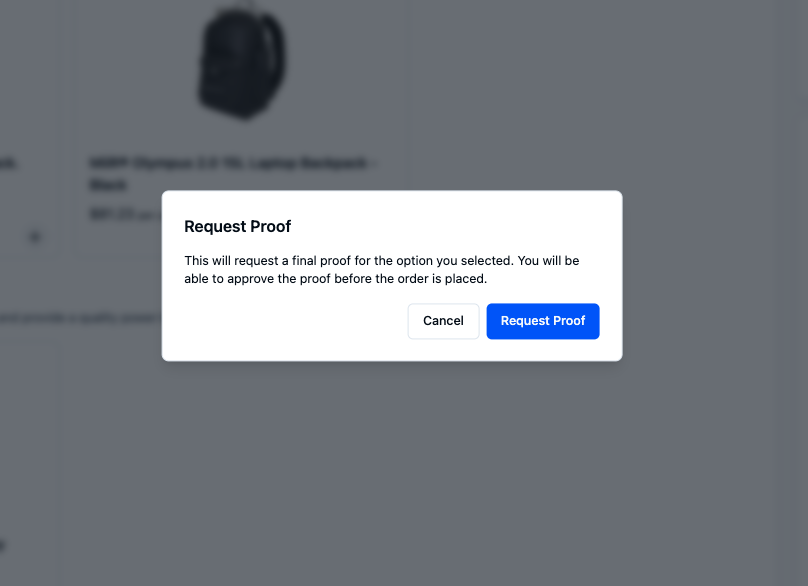
Requesting Proofs
Now you have your items selected and your order built out. Your next step is to "Request Proofs." This will automatically submit your project information and create your orders in our system. Each order associated with your project will come with it's own status' and final approvals. The art proofs act as the final approval for both artwork and order totals. Once requested, you should receive the proofs within 1 business day.
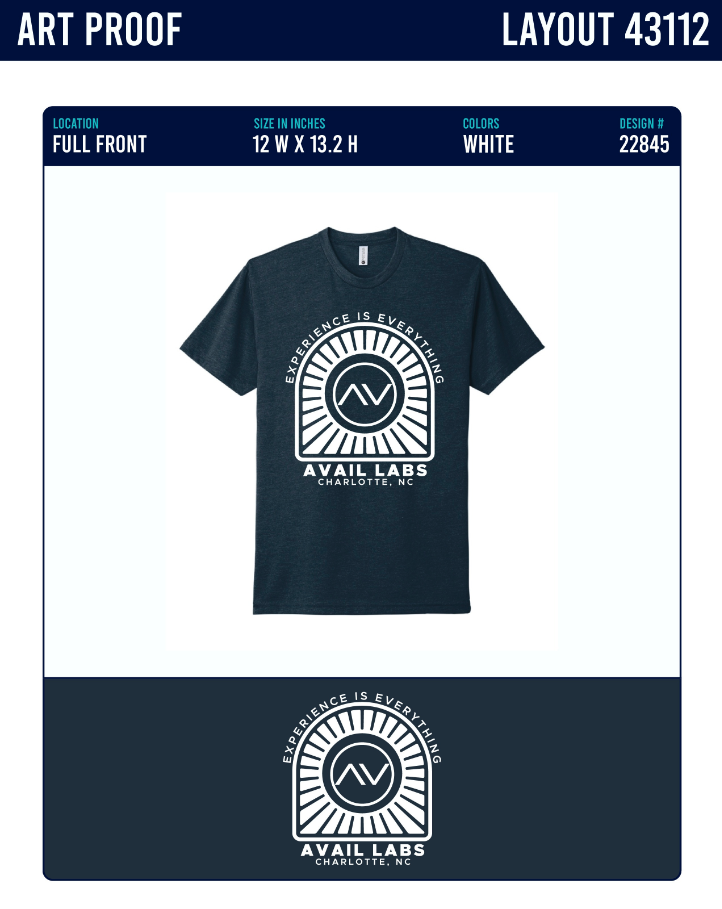
Approving Proofs
You'll be notified that your proofs are ready to review (Note: Most proofs are completed within 1 business day). Proofs are a critical stage of the project because they represent your final approval on both the artwork and order details. Be sure to thoroughly review:
Order Details
- Shipping Address = Where the goods will be delivered. (Note: if you are shipping to multiple addresses, only the first will display on the proof)
- Item Descriptions = The details of your products including brand, color, sizes, and cost
- Order Total = The total invoice associated with the order which includes shipping and tax
Art Proof
- Location = Where your logo will be placed on the product
- Sizes = The dimensions of the logo being decorated (Note: For some custom products "Maximum" will be used to ensure your logo fills the space allowed)
- Colors = The specific colors being printed or embroidered
- Design Number = The number that identifies your specific design in our system
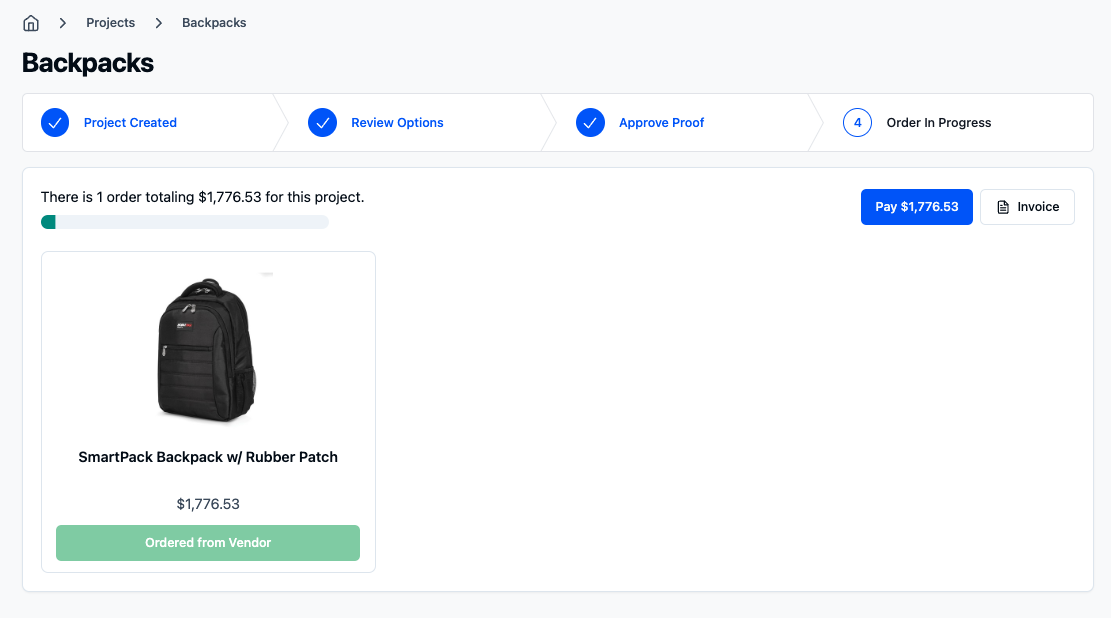
Tracking Order Status
Congratulations! Your proofs have been approved. Now what?... Now that everything is approved your orders will move into production. Your project can consist of one or multiple orders depending on the project. Connect makes it really simple to track both the Project Status and Order Status.
Each of your orders will come with it's own unique status. As they work through production, your overall Project Status will update too (No more guessing games!).
Messaging
We've all been there.. juggling multiple projects, massive email threads, and dozens of attachments. Connect makes communication simple and streamlined. In the Activity Section of each project you can chat your Account Managers and teammates.
Everyone assigned to the project will be notified of your update. Use "@" to tag someone in a message specifically or add attachments.

Invoicing and Payments
Managing multiple projects can mean a headache for accounting...With Connect, we've made it easier than ever to submit your projects for payment - regardless of how you pay. Once the orders within a project are complete, you'll receive one consolidated invoice. If your account requires Purchase Orders, your Purchase Order number will be included on the project invoice.
You can also add and invite your Accounting Team directly to your Connect account. This will allow them to process payments as projects get completed.
Payment Methods Supported:
- Direct ACH Payments
- Checks by Mail
- Credit Cards (Mastercard, VISA, AMEX, Discover)
.png)
Managing Inventory
If your account holds inventory with Avail, Connect makes managing it super simple. From the "Inventory" tab you can access your SKUS, view shipments, and send swag - all from an easy to use dashboard.
Inventory Reporting
In your "SKUs" dashboard, you'll see your global live inventory across all of your stores. You'll find the image, SKU number, description, value, and available quantities for each of your products. You can filter your products by store or download the inventory report into .CSV format.
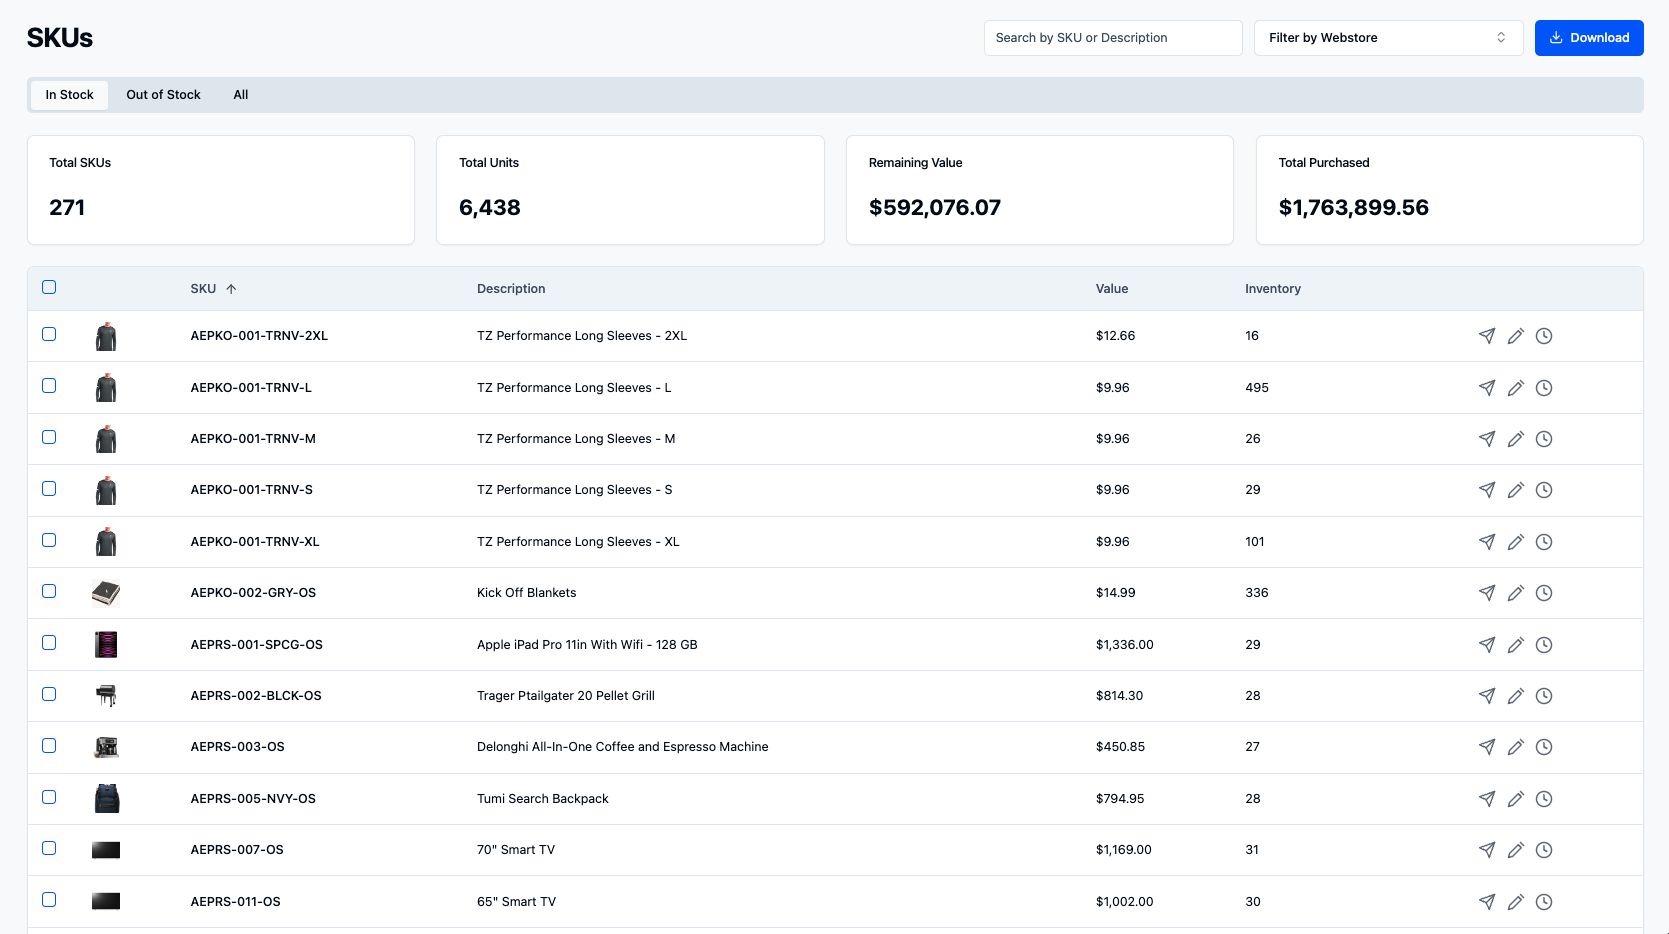
SKU Settings
From your dashboard, you can also edit each of your SKU's settings. Here you can control a variety of variables that make managing inventory even easier.
- Minimum Level = This is the minimum quantity that should remain in stock. If inventory drops below this minimum level, you will be notified
- Par Level = This is the re-order threshold that should be used when restocking. This tells Avail how many to suggest for the re-orders
- Unit Value = By default, Avail will average your purchase prices for the Unit Value. By adjusting the "Unit Value," you will override the average purchase price.

Sending Shipments
If you hold inventory with Avail, you can send shipments directly from Connect. Locate your Inventory tab and click "Send Shipment." From here, you can build out your order. You'll be prompted to select which products you want to send and where you'd like to send them. Once your submit your order, you can view your shipments and tracking information under "Shipments."
Pro Tip: You can schedule your shipments ahead of time using "Earliest Ship Date"
Frequently Asked Questions
How can I schedule a demo on Connect?
If you have specific questions about Connect, and would like to speak to one of our team members directly. You can schedule a demo for a time that works for you.
Can I submit feedback on the platform?
Have an idea for Connect you would like to see come to life? Send us your feedback and our team will consider it for future updates!